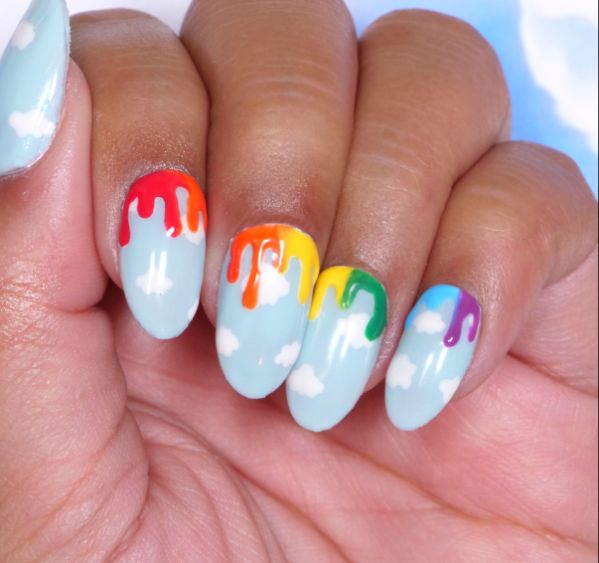
Painting nail art at home can be difficult, especially if the design calls for precision. There’s nothing worse than getting partially through a pretty manicure and accidentally messing up the design. Instead of stressing out, why not give this drippy rainbow manicure a try?
This cute design is set against a dreamy sky blue background. Paint all the nails baby blue initially, add some puffy white clouds, then get ready for the fun part. To make the rainbow really pop, paint a white pattern as a priming layer on each nail. After that, add some bright colors, and the rainbows will come to life.
Advertisement
Materials
- Pale blue gel nail polish
- UV or LED lamp (not shown)
- White gel nail paint
- Dotting tool
- Red gel nail paint
- Fine detail art brush
- Orange gel nail paint
- Yellow gel nail paint
- Green gel nail paint
- Blue gel nail paint
- Purple gel nail paint
- Pale blue gel nail polish
- UV or LED lamp (not shown)
- White gel nail paint
- Dotting tool
- Red gel nail paint
- Fine detail art brush
- Orange gel nail paint
- Yellow gel nail paint
- Green gel nail paint
- Blue gel nail paint
- Purple gel nail paint

Fierce League
Instructions
1. Apply two coats of pale blue gel nail polish to the nails. Cure the nails in between coats with a UV or LED lamp.
1. Apply two coats of pale blue gel nail polish to the nails. Cure the nails in between coats with a UV or LED lamp.
2. To create clouds, dip the dotting tool into the white gel nail paint, and dab a series of dots close together on each nail. Cure the paint with the lamp before proceeding.
3. Draw a white drip pattern that follows the cuticle of the nail, then paint vertical lines of different lengths extending from it. Cure once more with the lamp. Tip: Don’t worry if the designs don’t match. The effect should be random.
4. Each nail will have “drips” of color in two shades. On one nail only, apply red gel paint on top of half of the white “drips” by using a fine detail brush. Paint the other half of the “drips” orange, then cure with the lamp.
5. On the next nail, repeat the process in step four, but use orange and yellow paint, then cure your nail with the lamp. Note: This step was not shown in the video, but you’ll achieve a prettier rainbow by beginning each new nail “drip” by repeating the last color painted on the previous nail. For example, red and orange, orange and yellow, yellow and green, etc.
6. Complete the rainbow by filling in the “drips” on the final nail with blue and purple paint. Cure the last nail to set the paint.
Advertisement
