The humble honeybee has long been a source of aesthetic inspiration. Something about those cute black and yellow stripes combined with their delicate wings makes them fascinating to watch. So if you're looking for nail art inspiration, a bee-inspired look could be an obvious choice.
But this is a bee nail tutorial with a difference. Rather than your classic yellow-on-black color combo, you can use gold to give the honeybee a glamorous makeover. By including some gold honeycomb-shaped gemstones, you can elevate the look even further. If you thought that a bee design couldn't be high fashion, well, this design will prove otherwise.
Advertisement
Materials
- Professional Nail Boutique oval brush in 2G/6-S
- Leafgel gel in milky white K08 and clear camel in K10
- Ageha Cosme color gel in clear red-brown 510
- Gelish foundation
- Tweezers
- Gold charms in hexagon and bee shapes
- Presto brush in Art Fine Point 5
- Dot gold metal gel
- Kupa no wipe top coat
Fierce League
Instructions
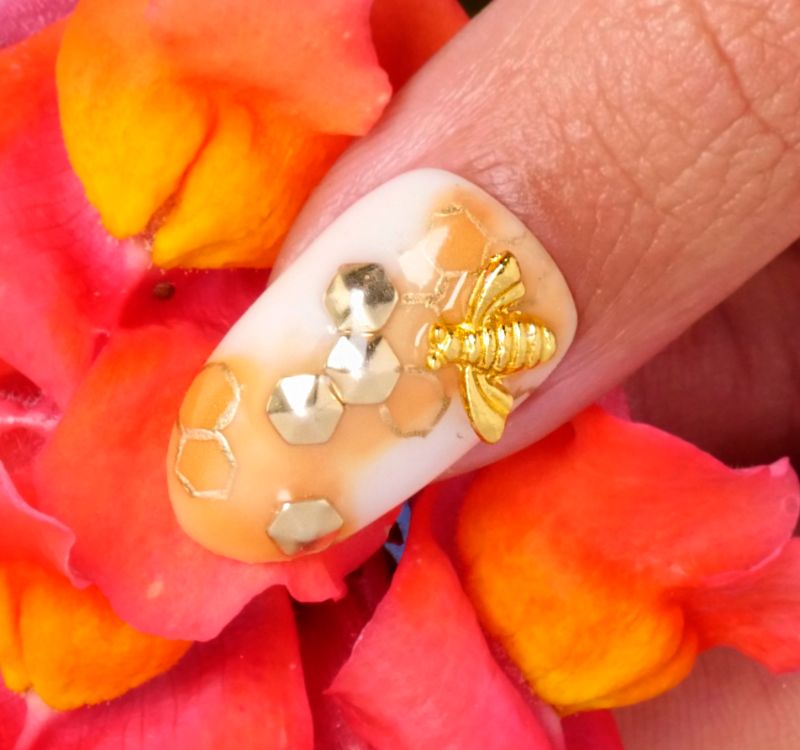
1. Start by applying two coats of a milky white gel polish using a flat oval brush for your base color. Cure under a gel lamp.
2. Take a clear camel-colored gel, and paint a diagonal curved stripe across the center of the nail. Cure again.
3. Apply a clear red-brown gel to each edge of your diagonal stripe, and cure once more.
4. Apply a layer of clear base coat across your whole nail. This will help your embellishments adhere.
5. Use tweezers to place hexagonal gold embellishments overlapping with the diagonal stripe. Once you're happy with your placement, cure under the lamp again.
6. Using a very fine liner brush and a gold gel polish, draw outlines of more hexagon shapes to mirror your embellishments. Cure again.
7. Apply some more of the base coat next to your hexagons, and place a bee embellishment on top. Cure once more to secure in place.
Advertisement
8. Finish by applying a clear topcoat and curing for a final time to ensure your manicure lasts.