What's great about nail art is that you can put almost any picture or print you see in reality onto your hands. You can spell out words, paint faces on them or even pierce them like some people do their ears and faces.
There are endless options to turn any trend into a manicure, and this one is a throwback. In the 90s, it was hard to escape tribal tattoos. But if you weren't a part of the trend then, you can be a part of it now. A steady and delicate hand will make this print come off clean and sleek, so pay attention to the details.
Advertisement
Materials
- Gel base coat
- White gel polish
- Black gel polish
- Striper brush
- Dotting tool
- Gel top coat
- Gel base coat
- White gel polish
- Black gel polish
- Striper brush
- Dotting tool
- Gel top coat
Fierce League
Instructions
1. Apply a base coat and allow it to dry.
1. Apply a base coat and allow it to dry.
2. Paint at least two even coats of the white polish. Make sure the layers of polish are evenly applied.
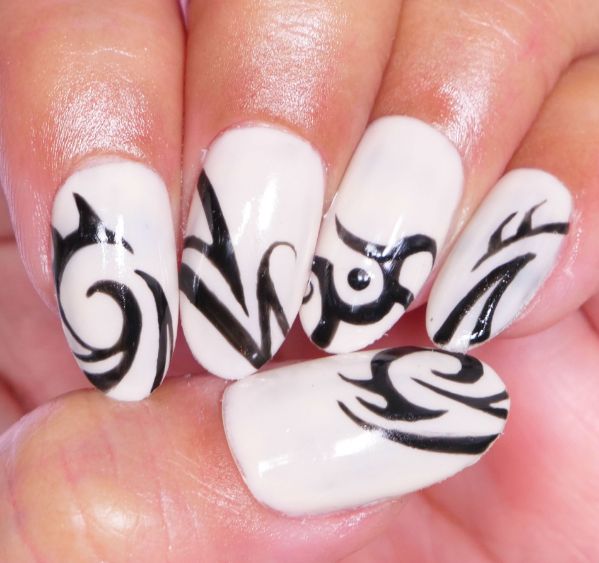
3. Paint a crescent curve near the side of the nail in black polish with a striper brush. The bottom of the curve should come up sharply and resemble an ocean wave. Add a pointed horn curve at the top.
4. On the next nail, draw a line from one side of the nail bed extending diagonally toward the opposite side. Stop in the middle of the nail, and create a point by connecting another line going back. Add a thick line along the bottom of the point to create a zigzag effect.
5. The nail on your ring finger will serve as the accent nail. Start with a thick C-shape curve toward the bottom center of the nail. Round off the edges of this shape by flaring it out into hook-like points. Connect this shape to the edges of the nail with more curvy C-shapes.
6. Add a black dot right in the middle of first C-shape with the dotting tool.
7. You can repeat any one of these tribal patterns on your pinky and thumb nails or combine elements from each one. Continue until all fingernails have designs.
Advertisement
8. Apply a top coat and allow the designs to dry.