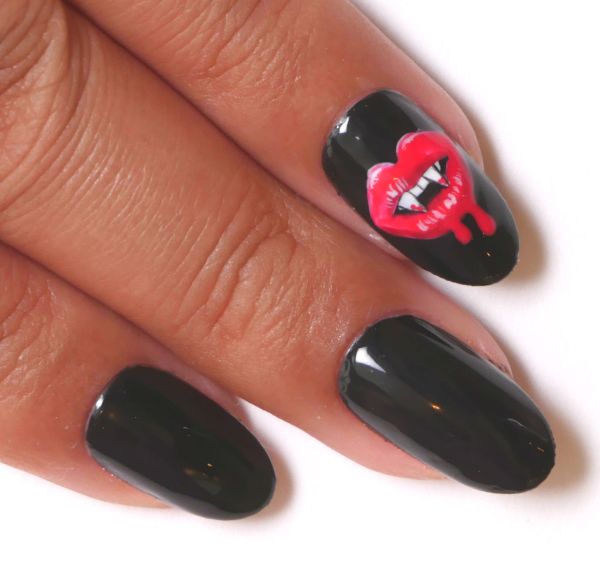
Sometimes, one eye-catching design is all a manicure needs to make it extra special. This bloody vampire lip design appears to be in 3D because it's drawn with the same techniques used to create contours when doing makeup. The trick is to strategically place darker and lighter shades onto the design to give it the illusion of depth.
The black nail sets the stage for a surprising pair of lips with fangs, but don't shy away from this one. In the video, each step is detailed slowly, so what begins as a white lip design evolves with each additional color. Red, black and white nail paints bring this creepy design to life, so get ready to draw blood – in the design, of course.
Advertisement
Materials
- Black gel nail paint
- UV or LED lamp (not shown)
- White gel nail paint
- Dotting tool
- Red gel nail paint
- Nail art brush
- Small dish
- Ultra fine-tipped nail brush
- Clear gel top coat (not shown)
- Black gel nail paint
- UV or LED lamp (not shown)
- White gel nail paint
- Dotting tool
- Red gel nail paint
- Nail art brush
- Small dish
- Ultra fine-tipped nail brush
- Clear gel top coat (not shown)
Fierce League
Instructions
1. Apply two coats of black gel nail polish and cure with the UV or LED lamp.
1. Apply two coats of black gel nail polish and cure with the UV or LED lamp.
2. Dip the dotting tool into the white gel paint and draw an open-mouthed lip design. Cure under the lamp. (Don't skip this step. Applying red paint directly onto the black nail won't have the same intensity as it will when layered over a white base.)
3. Layer red gel nail paint over the white with a nail art brush and cure again.
4. Mix red and black paint in the small dish with the dotting tool to create a deeper shade of red, and paint a thin line around the lips with this color and cure again. This creates the contour.
5. Draw the teeth below the upper lip with the white gel paint and an ultra fine-tipped nail art brush, making sure the outer fangs are pointy and the inner teeth are square before curing again.
6. Outline the teeth with black gel paint and the ultra fine-tipped nail art brush to create dimension and cure with the lamp.
7. To add contour lines to the lip, use the ultra fine-tipped brush to apply a few small vertical white lines on both lips and cure.
8. Add a few blood drops below the lip and on the tip of each fang with the dotting tool and cure.
9. Apply a layer of clear gel top coat and cure one more time if you want to really protect the design.
Advertisement